#CozeAPI 介绍
@Coze/api 是 Coze 官方提供的API调用服务接口,我在看官方SDK源码的时候注意到了这个包,我也很好奇它的封装原理,那就写下这篇文章记录一下吧。
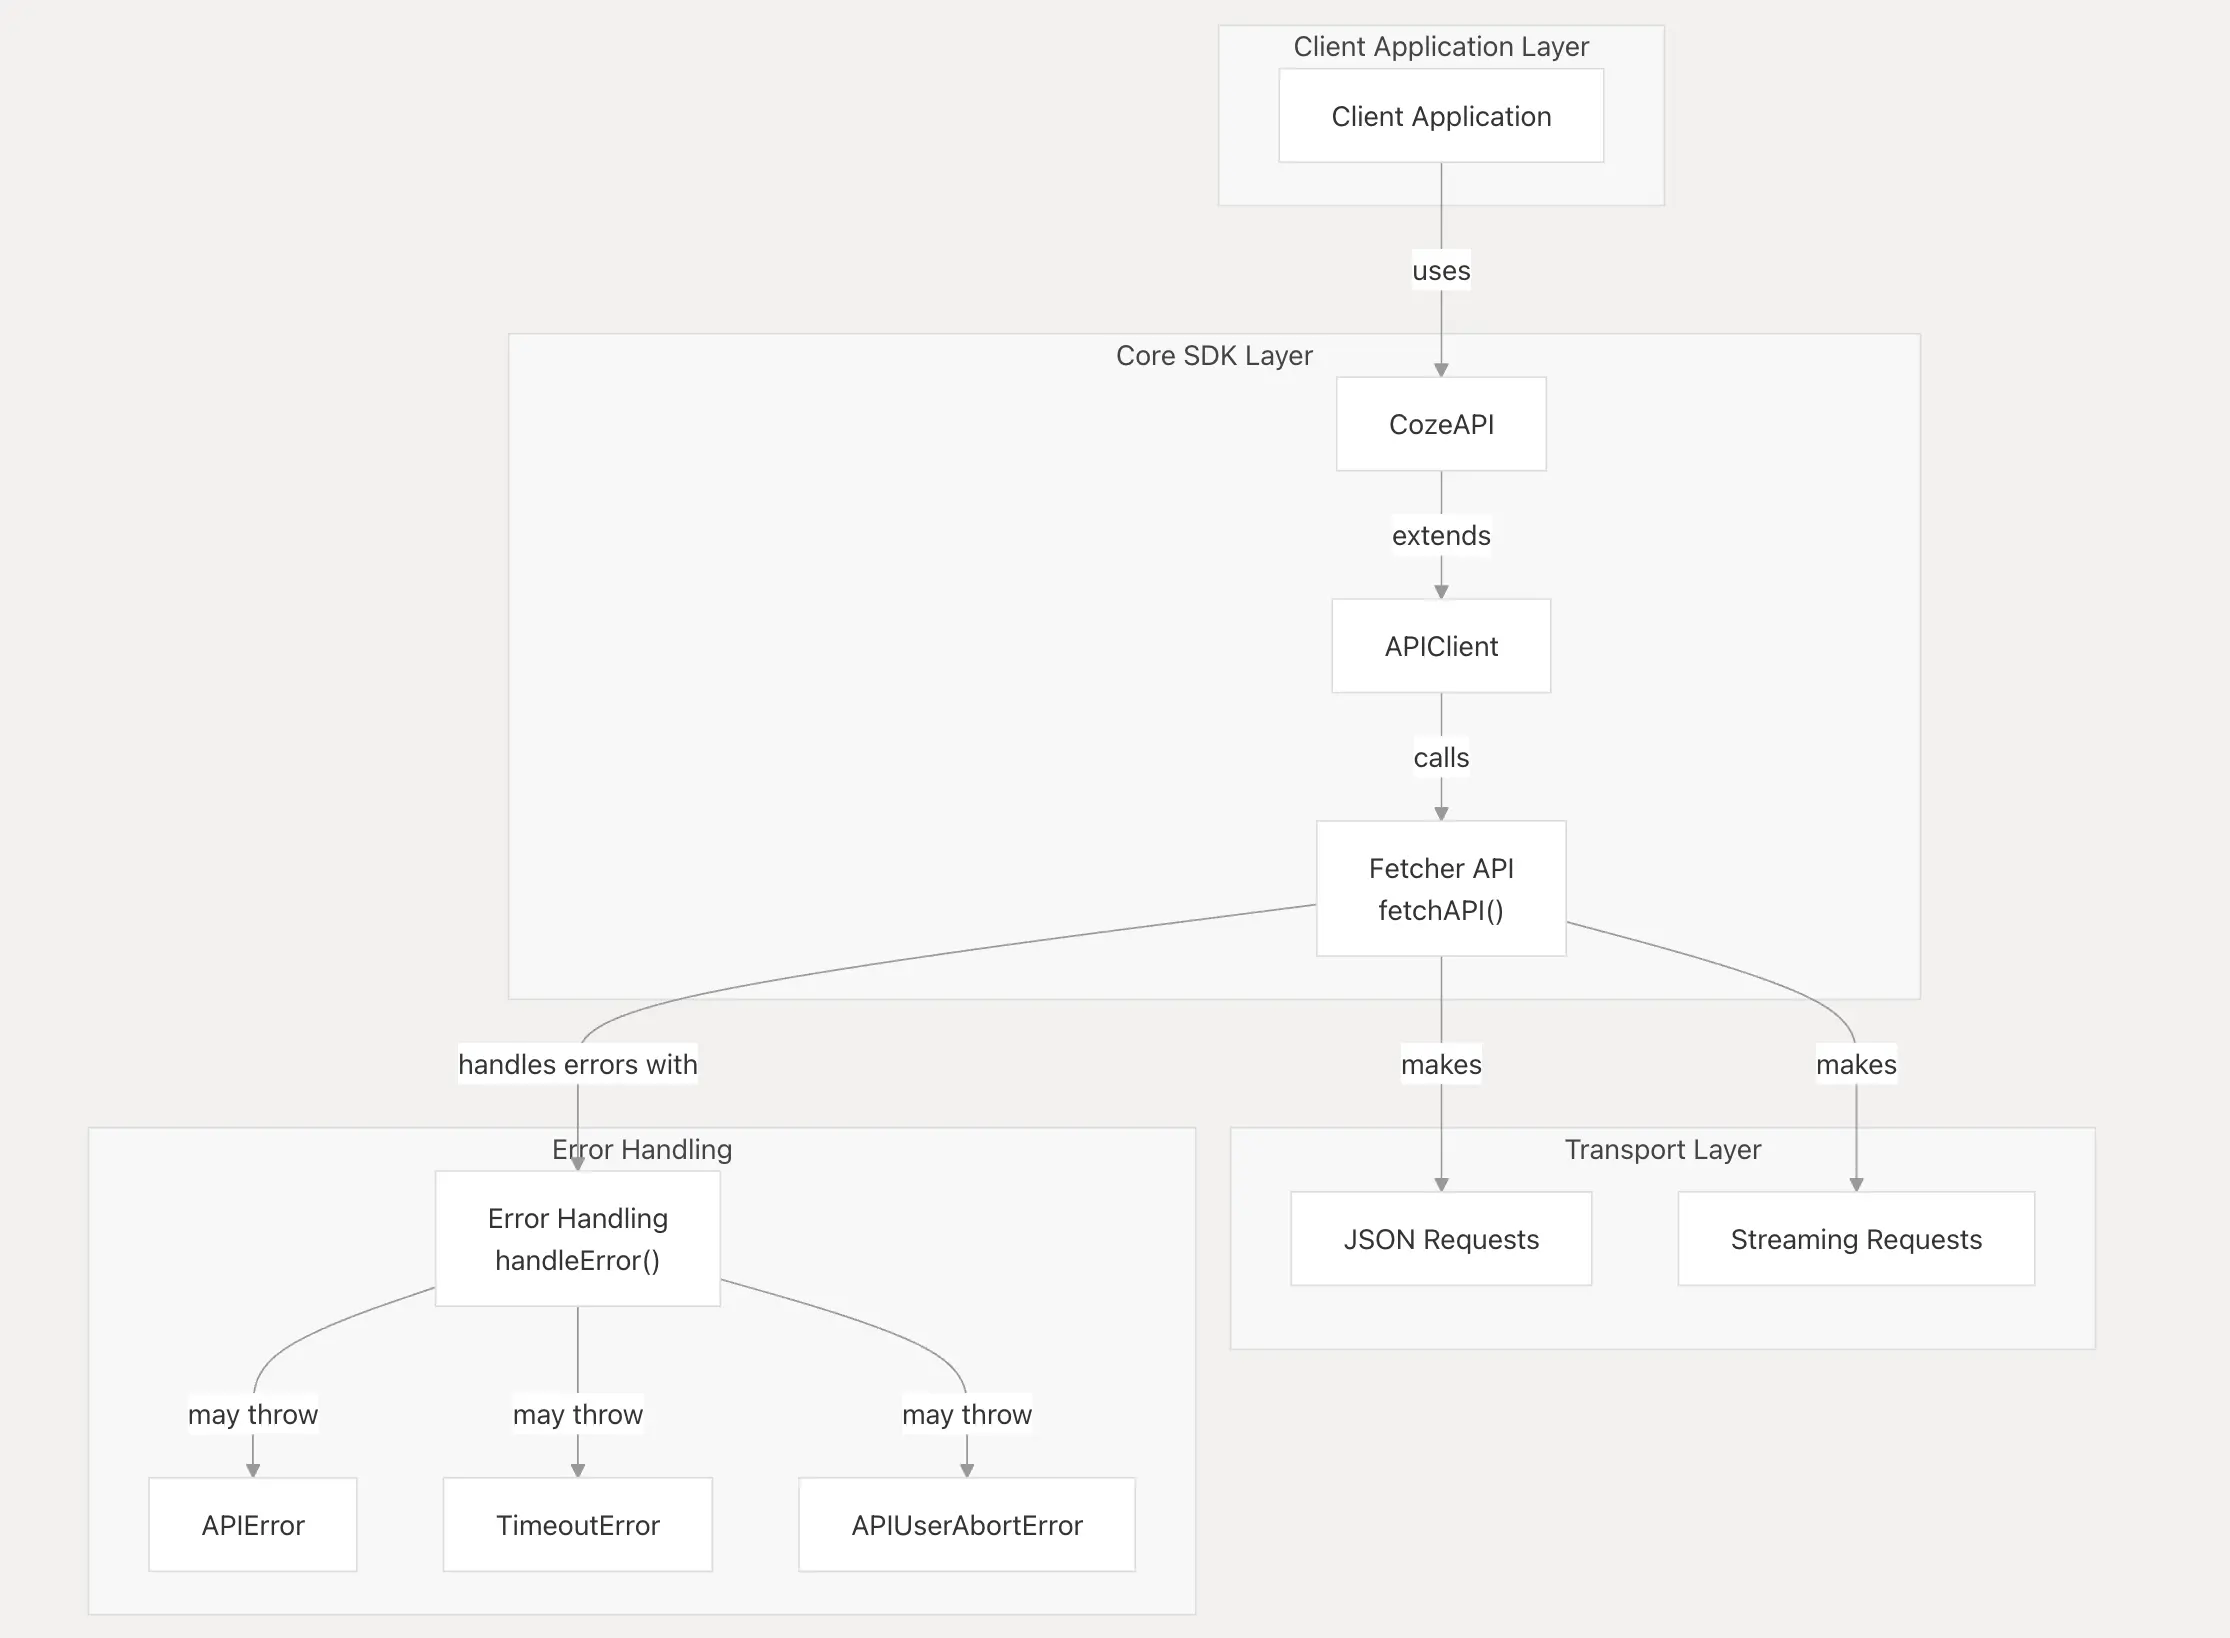
Cozejs 提供了由 DeepWiki 生成的 AI文档,里面详述了 @coze/api 整体的架构
#基本用法.
import { CozeAPI, COZE_CN_BASE_URL, ChatStatus, RoleType } from '@coze/api';

// 使用个人访问令牌初始化客户端
const client = new CozeAPI({
  token: 'your_pat_token', // 从 https://www.coze.cn/open/oauth/pats 获取你的 PAT
  // 或者
  // token: async () => {
  //   // 如果令牌过期则刷新
  //   return 'your_oauth_token';
  // },
  baseURL: COZE_CN_BASE_URL,
});

// 简单对话示例
async function quickChat() {
  const v = await client.chat.createAndPoll({
    bot_id: 'your_bot_id',
    additional_messages: [{
      role: RoleType.User,
      content: 'Hello!',
      content_type: 'text',
    }],
  });

  if (v.chat.status === ChatStatus.COMPLETED) {
    for (const item of v.messages) {
      console.log('[%s]:[%s]:%s', item.role, item.type, item.content);
    }
    console.log('usage', v.chat.usage);
  }
}
可以看出 CozeAPI 是一个类,在简单的初始化之后我们就可以使用它的实例来调用 Coze 平台的对话服务了。
接下来我们重点关注它是如何将 Coze 服务集成到这个类中的。
#CozeAPI
import * as API from './resources/index';
import { APIClient } from './core';

export class CozeAPI extends APIClient {
  bots: API.Bots = new API.Bots(this);
  chat: API.Chat = new API.Chat(this);
  conversations: API.Conversations = new API.Conversations(this);
  files: API.Files = new API.Files(this);
  /**
   * @deprecated
   */
  knowledge: API.Knowledge = new API.Knowledge(this);
  datasets: API.Datasets = new API.Datasets(this);
  workflows: API.Workflows = new API.Workflows(this);
  workspaces: API.WorkSpaces = new API.WorkSpaces(this);
  audio: API.Audio = new API.Audio(this);
  templates: API.Templates = new API.Templates(this);
  websockets: API.Websockets = new API.Websockets(this);
  variables: API.Variables = new API.Variables(this);
  users: API.Users = new API.Users(this);
}
它是作为入口类来调用的,而继承的 APIClient 类作为父类来使用。
你可以看到new API.XXX(this) 这样的代码,注入整个 CozeAPI 实例,CozeAPI 继承的 APIClient 类背后大有文章,也是整个类的核心所在。
让我启发的点在于:平时编程大多都是面向过程编程,其实面向对象的编码模式有时候会让代码看起来清楚很多,所以我要多学习运用这种编程模式
#APIClient
export class APIClient {
  protected _config: ClientOptions;
  baseURL: string;
  token: GetToken;
  axiosOptions?: RequestOptions;
  axiosInstance?: AxiosInstance | unknown;
  debug: boolean;
  allowPersonalAccessTokenInBrowser: boolean;
  headers?: Headers | Record<string, unknown>;
  baseWsURL: string;
  constructor(config: ClientOptions) {
    this._config = config;
    this.baseURL = config.baseURL || COZE_COM_BASE_URL;
    this.baseWsURL = config.baseWsURL || COZE_CN_BASE_WS_URL;
    this.token = config.token;
    this.axiosOptions = config.axiosOptions || {};
    this.axiosInstance = config.axiosInstance;
    this.debug = config.debug || false;
    this.allowPersonalAccessTokenInBrowser =
      config.allowPersonalAccessTokenInBrowser || false;
    this.headers = config.headers;

    if (
      isBrowser() &&
      typeof this.token !== 'function' &&
      isPersonalAccessToken(this.token) &&
      !this.allowPersonalAccessTokenInBrowser
    ) {
      throw new Errors.CozeError(
        'Browser environments do not support authentication using Personal Access Token (PAT) by default.\nas it may expose secret API keys. \n\nPlease use OAuth2.0 authentication mechanism. see:\nhttps://www.coze.com/docs/developer_guides/oauth_apps?_lang=en \n\nIf you need to force use, please set the `allowPersonalAccessTokenInBrowser` option to `true`. \n\ne.g new CozeAPI({ token, allowPersonalAccessTokenInBrowser: true });\n\n',
      );
    }
  }

  static APIError = Errors.APIError;
  static BadRequestError = Errors.BadRequestError;
  static AuthenticationError = Errors.AuthenticationError;
  static PermissionDeniedError = Errors.PermissionDeniedError;
  static NotFoundError = Errors.NotFoundError;
  static RateLimitError = Errors.RateLimitError;
  static InternalServerError = Errors.InternalServerError;
  static GatewayError = Errors.GatewayError;
  static TimeoutError = Errors.TimeoutError;
  static UserAbortError = Errors.APIUserAbortError;

  protected async getToken(): Promise<string> { ... }

  protected async buildOptions() { ... }

  protected async buildWebsocketOptions() { ... }

  public async makeRequest<Req, Rsq>() { ... }

  async post<Req, Rsq>() { ... }

  async get<Req, Rsq>() { ... }

  async put<Req, Rsq>() { ... }

  async delete<Req, Rsp>() { ... }

  public async makeWebsocket<Req, Rsq>() { ... }

  public getConfig() { ... }

  public debugLog(forceDebug = false, ...msgs: any[]) { ... }
}
APIClient类的构造器初始化了一些类属性,其中 axiosOptions 属性代表CozeAPI底层使用的是 axios 来发起网络请求的,CozeAPI 也对错误处理封装了自己的错误处理类。
在这个类中,可以看到我们项目中常用的RESTAPI请求方法:
  async post<Req, Rsp>(
    apiUrl: string,
    body?: Req,
    isStream = false,
    options?: RequestOptions,
  ): Promise<Rsp> {
    return this.makeRequest<Req, Rsp>(apiUrl, 'POST', body, isStream, options);
}这里就介绍一种POST方法,其余的请求方法都是一个的方式封装的,感兴趣可以看一下core.ts可以看到整个方法其实是围绕着 makeRequest 驱动的。
  public async makeRequest<Req, Rsp>(
    apiUrl: string,
    method: 'GET' | 'POST' | 'PUT' | 'DELETE',
    body?: Req,
    isStream?: boolean,
    options?: RequestOptions,
  ): Promise<Rsp> {
    const fullUrl = `${this.baseURL}${apiUrl}`;

    try {
      const fetchOptions = await this.buildOptions(method, body, options);
      fetchOptions.isStreaming = isStream;
      fetchOptions.axiosInstance = this.axiosInstance;

      this.debugLog(options?.debug, `--- request url: ${fullUrl}`);
      this.debugLog(options?.debug, '--- request options:', fetchOptions);

      const { response, stream, json } = await fetchAPI(fullUrl, fetchOptions);

      this.debugLog(options?.debug, `--- response status: ${response.status}`);
      this.debugLog(options?.debug, '--- response headers: ', response.headers);

      // Taro use `header`
      const contentType = (response.headers ??
        (response as unknown as Record<string, string>).header)['content-type'];

      if (isStream) {
        if (contentType && contentType.includes('application/json')) {
          const result = (await json()) as {
            code: number;
            msg: string;
          } & Record<string, unknown>;
          const { code, msg } = result;
          if (code !== 0 && code !== undefined) {
            throw APIError.generate(
              response.status,
              result as ErrorRes,
              msg,
              response.headers as AxiosResponseHeaders,
            );
          }
        }
        return stream() as Rsp;
      }

      if (contentType && contentType.includes('application/json')) {
        const result = (await json()) as { code: number; msg: string } & Record<
          string,
          unknown
        >;
        const { code, msg } = result;
        if (code !== 0 && code !== undefined) {
          throw APIError.generate(
            response.status,
            result as ErrorRes,
            msg,
            response.headers as AxiosResponseHeaders,
          );
        }

        return result as Rsp;
      } else {
        return (await response.data) as Rsp;
      }
    } catch (error: unknown) {
      // Call the onApiError callback if provided
      // This handles network errors and other exceptions not caught above
      const onApiError = options?.onApiError || this._config?.onApiError;
      if (onApiError) {
        onApiError(error as APIError);
      }
      // Re-throw the error after calling the callback
      throw error;
    }
  }
这个方法,封装了RESTAPI,方法中有两个方法比较重点:
- buildOptions: 将用户传入的
method、body、options整理并返回 - fetcheAPI:发起请求的方法,支持流式请求
- debugLog:类中封装的debug方法,实际上是使用的是 console.debug方法
  protected async buildOptions(
    method: 'GET' | 'POST' | 'PUT' | 'DELETE',
    body?: unknown,
    options?: RequestOptions,
  ): Promise<FetchAPIOptions> {
    const token = await this.getToken();
    const headers: Record<string, string> = {
      authorization: `Bearer ${token}`,
    };

    if (isUniApp()) {
      headers['X-Coze-Client-User-Agent'] = getUniAppClientUserAgent();
    } else if (isBrowser() || isBrowserExtension()) {
      headers['X-Coze-Client-User-Agent'] = getBrowserClientUserAgent();
    } else {
      headers['User-Agent'] = getUserAgent();
      headers['X-Coze-Client-User-Agent'] = getNodeClientUserAgent();
    }

    const config = mergeConfig(
      this.axiosOptions,
      options,
      { headers },
      { headers: this.headers || {} },
    );
    config.method = method;
    config.data = body;

    return config;
  }
这个方法内容也比较简单,主要是在请求头上添加一些自定义的字段再通过 mergeConfig 方法进行配置合并返回给用户。
export async function fetchAPI<ResultType>(
  url: string,
  options: FetchAPIOptions = {},
) {
  const axiosInstance = options.axiosInstance || axios;

  // Add version check for streaming requests
  if (options.isStreaming && isAxiosStatic(axiosInstance)) {
    const axiosVersion = axiosInstance.VERSION || axios.VERSION;
    if (!axiosVersion || compareVersions(axiosVersion, '1.7.1') < 0) {
      throw new CozeError(
        'Streaming requests require axios version 1.7.1 or higher. Please upgrade your axios version.',
      );
    }
  }

  // Check for 4101 authentication error
  // If BaseURL is set to overseas address, provide a warning to try setting it to the domestic address
  const checkError = () => {
    if (url.startsWith(COZE_COM_BASE_URL)) {
      console.warn(`
鉴权失败,如果您是国内用户,请将 baseURL 设置为 ${COZE_CN_BASE_URL} 示例:
new CozeAPI({
  // ...
  baseURL: COZE_CN_BASE_URL
})`);
    }
  };

  const response: AxiosResponse = await (axiosInstance as AxiosInstance)({
    url,
    responseType: options.isStreaming ? 'stream' : 'json',
    adapter: options.isStreaming
      ? isSupportNativeFetch()
        ? 'fetch'
        : adapterFetch
      : undefined,
    ...options,
  }).catch((error: AxiosResponse) => {
    if (error?.status === 401) {
      checkError();
    }
    throw handleError(error);
  });

  return {
    async *stream(): AsyncGenerator<ResultType> {
      try {
        const stream = response.data;
        const reader = stream[Symbol.asyncIterator]
          ? stream[Symbol.asyncIterator]()
          : stream.getReader();
        const decoder = new TextDecoder();
        const fieldValues: Record<string, string> = {};
        let buffer = '';
        while (true) {
          const { done, value } = await (reader.next
            ? reader.next()
            : reader.read());
          if (done) {
            if (buffer) {
              // If the stream ends without a newline, it means an error occurred
              fieldValues.event = 'error';
              fieldValues.data = buffer;
              try {
                const error = JSON.parse(buffer);
                if (error?.code === 4101) {
                  checkError();
                }
                // eslint-disable-next-line no-empty
              } catch (e) {}
              yield fieldValues as ResultType;
            }
            break;
          }
          buffer += decoder.decode(value, { stream: true });
          const lines = buffer.split('\n');
          for (let i = 0; i < lines.length - 1; i++) {
            const line = lines[i];

            const index = line.indexOf(':');
            if (index !== -1) {
              const field = line.substring(0, index).trim();
              const content = line.substring(index + 1).trim();
              fieldValues[field] = content;
              if (field === 'data') {
                yield fieldValues as ResultType;
              }
            }
          }
          buffer = lines[lines.length - 1]; // Keep the last incomplete line in the buffer
        }
      } catch (error) {
        handleError(error);
      }
    },
    json: () => response.data as ResultType,
    response,
  };
}
这个方法是CozeAPI发起请求的核心。
方法开头判断了如果是流式请求,那么 axios 的版本要在 1.7.1 以上。
我也是看了这个代码才明白 axios 也是近期支持的流式请求
  const response: AxiosResponse = await (axiosInstance as AxiosInstance)({
    url,
    responseType: options.isStreaming ? 'stream' : 'json',
    adapter: options.isStreaming
      ? isSupportNativeFetch()
        ? 'fetch'
        : adapterFetch
      : undefined,
    ...options,
  }).catch((error: AxiosResponse) => {
    if (error?.status === 401) {
      checkError();
    }
    throw handleError(error);
  });
response 方法直接调用了 axios 来发起请求,也对错误进行了处理。
fetchAPI 方法调用会回返回三个参数:
- response: 调用axios 返回的请求体对象
- json:axios请求体中的data对象
- stream:迭代函数,用于处理流式请求
    async *stream(): AsyncGenerator<ResultType> {
      try {
        const stream = response.data;
        const reader = stream[Symbol.asyncIterator]
          ? stream[Symbol.asyncIterator]()
          : stream.getReader();
        const decoder = new TextDecoder();
        const fieldValues: Record<string, string> = {};
        let buffer = '';
        while (true) {
          const { done, value } = await (reader.next
            ? reader.next()
            : reader.read());
          if (done) {
            if (buffer) {
              // If the stream ends without a newline, it means an error occurred
              fieldValues.event = 'error';
              fieldValues.data = buffer;
              try {
                const error = JSON.parse(buffer);
                if (error?.code === 4101) {
                  checkError();
                }
                // eslint-disable-next-line no-empty
              } catch (e) {}
              yield fieldValues as ResultType;
            }
            break;
          }
          buffer += decoder.decode(value, { stream: true });
          const lines = buffer.split('\n');
          for (let i = 0; i < lines.length - 1; i++) {
            const line = lines[i];

            const index = line.indexOf(':');
            if (index !== -1) {
              const field = line.substring(0, index).trim();
              const content = line.substring(index + 1).trim();
              fieldValues[field] = content;
              if (field === 'data') {
                yield fieldValues as ResultType;
              }
            }
          }
          buffer = lines[lines.length - 1]; // Keep the last incomplete line in the buffer
        }
      } catch (error) {
        handleError(error);
      }
    }
它可以处理流式响应,跟我们普通的 RESTAPI 请求不一样,响应是将内容全部返回,流式响应返回的内容是“一段一段”的,所以我们需要迭代解析流式数据,这个函数主要做的就是这件事,后续执行 stream 方法的时候是要用到 await for of 这种迭代方式的去读取 fieldValues 的值的。
异步 generator 教程
#错误处理
对于错误处理,Coze也封装的比较细致,内容是比较简单的,所以这里就记录一下它的源码地址,以便以后查看吧
#补充
父类 ApiClient 仅封装了请求方面,对于请求拦截功能没有实现,我觉得也是因为请求拦截是比较自定义化比较高的功能,所以它交给用户去实现,我在 @Coze/sdk 的源码中也找到了作者对 CozeAPI 类的扩展:源码链接。
核心思想是新建一个类去继承 CozeAPI 做扩展,根据自己的业务规则去定制拦截器和集成一些和业务相关的通用方法。
#结尾
@Coze/api 包也有针对 Taro 、Uniapp 这种跨平台开发框架的包,其原理也是一样。看完这个包,我觉得有时间也可以自己封装一个 ApiClinet 这种通用的父类的工具包,放在项目里使用,比起每次写项目都要打开以前的项目去复制一下封装好的请求方法要高效多了。
并且 Coze 对错误的处理分类很细致,对方法的权限级别也是用了类修饰符来区分,有很多值得我去学习的地方。
